Start with the composition, then verify the slabs
The same directional stone can read as a central mirrored feature, a linked run or a dispersed pattern. These diagrams isolate that design decision. Real slabs differ in colour, features, usable area and face preparation; a perfect digital reflection is not a promise of an identical physical match.
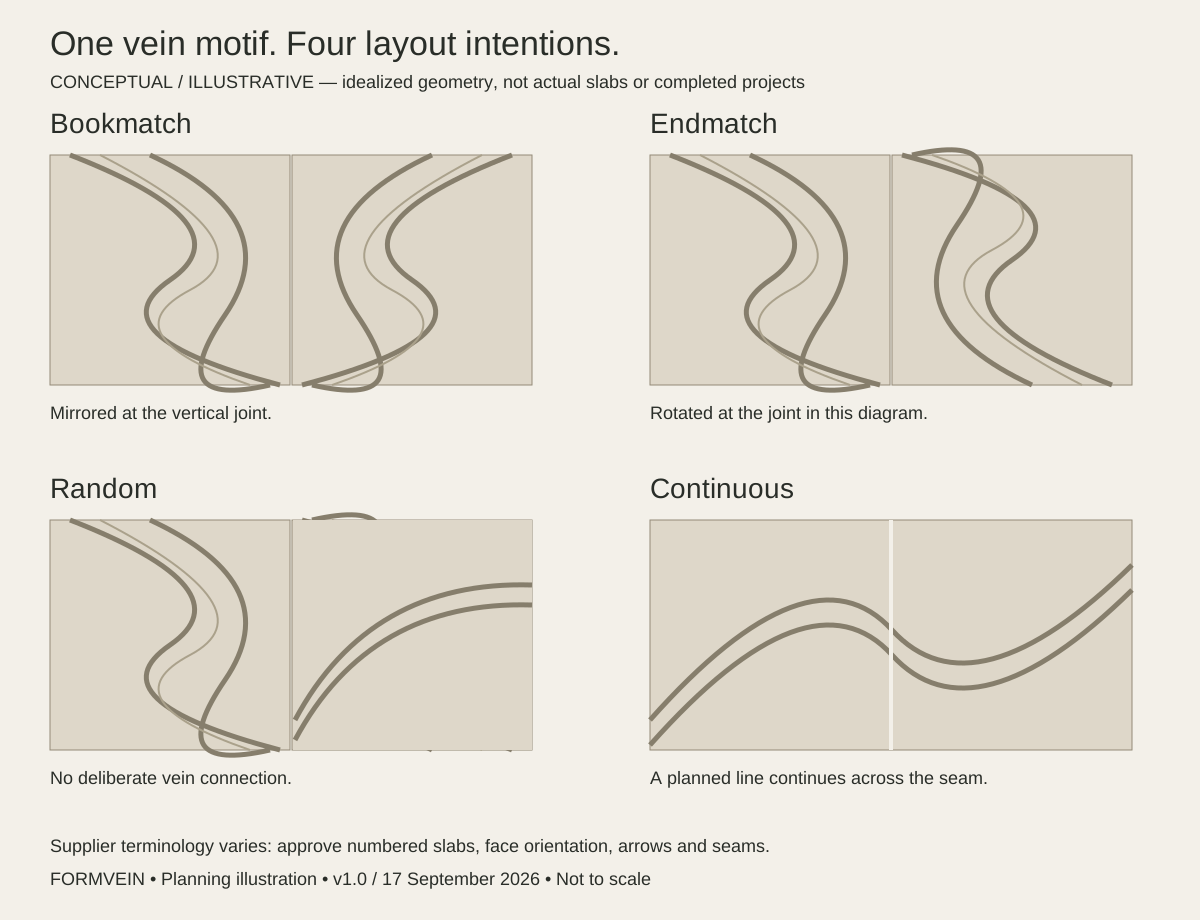
Four layout intentions to mark on your drawing
Bookmatch
Paired faces create a broadly mirrored composition across a seam. Ask whether suitable sequential slabs and prepared faces are available. Confirm which face is visible; simply flipping a finished slab may expose an unfinished or reinforced back.
Endmatch
Adjacent ends are arranged to connect or echo the vein, often through a rotated arrangement. This diagram uses a 180-degree rotation. Suppliers use the term differently, so specify the intended result with numbered slab images, orientation arrows and a seam detail.
Random
Pieces are placed without a deliberate vein connection. The result is a distributed pattern rather than a single focal motif. Review colour balance and conspicuous seams even when matching is not requested.
Continuous / vein-matched
Selected cuts aim to carry a vein across neighbouring pieces. This need not be a reflection. Confirm the proposed line using actual slab photos and a cutting layout; saw cuts, joint widths and natural variation can interrupt it.
These are layout intentions, not universal production definitions. Matching can restrict piece placement and increase material demand, but this illustration supports no numeric waste, yield or cost claim.
How the choice reads in a room
| Application | Visual decision | Before cutting |
|---|---|---|
| Feature wall | Bookmatch creates a central axis; continuous veins draw the eye across the elevation. Random placement disperses the focus. | Place the axis relative to doors, furniture and sockets. Show panel numbers, joints and visible edges. |
| Island & waterfall | A continuous intention links the top and return; bookmatch can focus attention on a broad top. Endmatching can connect adjacent lengths. | Review a top-and-return drawing with fold direction, mitres, cutouts and support interfaces. A flat diagram cannot prove a corner match. |
| Hotel lobby | A mirrored reception wall creates a focal point. A continuous run guides the eye; random flooring spreads movement across the room. | Approve the full elevation or floor plan, viewing direction and phase boundaries. Retain IDs through packing and installation. |
| Bathroom | A mirrored vanity backdrop frames a basin; a continuous wall composition carries the vein around selected surfaces. Random placement gives a less symmetrical field. | Coordinate niches, fittings, corners and cutouts. Layout approval does not establish wet-area or slip suitability; review the selected stone and finish separately. |
A five-part layout approval
- Request current full-slab photographs with slab IDs, dimensions and orientation.
- Overlay numbered pieces on the actual usable slab area, including cutting allowances and relevant natural features.
- Agree seams, face orientation, vein arrows and which edges remain visible.
- Review a labelled dry lay or agreed approval images against the drawing revision.
- Carry piece IDs into the packing list and installation layout; record the approving person and date.
Send the chosen layout with the RFQ brief and piece schedule. Explore slab supply, custom fabrication and project applications to define the supply scope.
Request current slab photos ↗For editors and project teams
FORMVEIN permits reuse and adaptation of these original templates and the labelled comparison diagram with credit and a link to this page. Keep the conceptual label with the diagram, and identify any edits. This permission covers these downloads, not other site imagery. The material is a planning aid; project requirements and final approvals must be agreed separately.
Source: https://formvein.com/resources/stone-vein-layout-guide · Version 1.0 · 17 September 2026. Editorial enquiries: hello@formvein.com.